Author: erin@gamblesphotography.com

How to Clean your Gutters

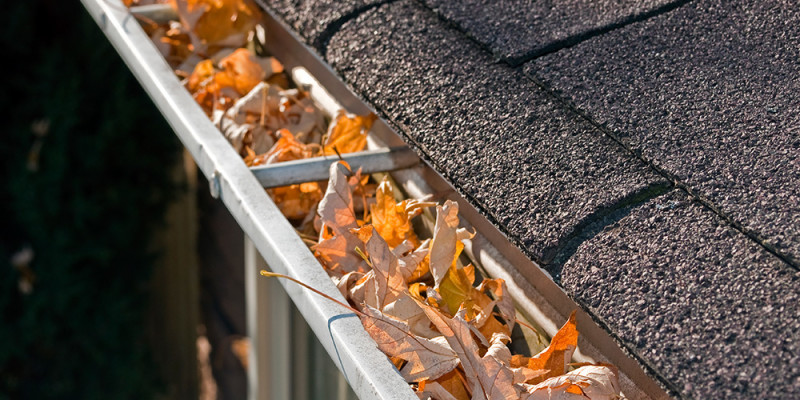
Having clean gutters is extremely important for the wellbeing of your home. By keeping water away from your home with a properly cleared gutter system you are protecting your roof, foundation, and you’re keeping the soil from eroding away.

gutters springfield mo

  1. Get a ladder, but don’t lean the ladder against a downspout or gutter, which can easily bend or break.  We highly recommend the use of a ladder stabilizer this will eliminate any gutter damage and increase safety.  A ladder stabilizer will lock the ladder into place preventing the ladder from slipping.
  2. Remove leaves and twigs from the gutters by hand with gloves, a spackle knife, a gutter scoop or a small garden trowel.
  3. Wet down caked-on dirt, which can be difficult to remove without damaging the gutter itself, then remove it with the spackle knife or trowel.
  4. Put debris in a bucket or plastic trash bag placed on the roof or ladder. If you use a bag, you can just drop it when it’s full. You can just throw the debris on the ground, but then you’ll have a mess to clean up afterwards.
  5. Check that the downspouts aren’t clogged. Use water to unclog your downspouts by placing a garden hose in the opening.  Simply take the downspout apart If a plugged downspout can’t be cleared with a hose.
  6. Use the hose to flush the gutters with water after cleaning. (This is also the best time to find out if there are any leaks in the system.)  Then finish up by using the blower to clean up any debris that fell on the ground for the finishing touch.

Now that you’re all done, do you ever want to do that again?? Not me! Call St Clair today and ask about Gutter Monster, the best gutter protection around. Call St Clair of the Ozarks in Springfield Missouri for all of your gutter protection needs!

Energy Efficient Windows

Windows provide our homes with light, warmth, and ventilation, but they can also negatively impact a home’s energy efficiency. You can reduce energy costs by installing energy-efficient windows in your home. If your budget is tight, energy efficiency improvements to existing windows can also help.

IMPROVING THE ENERGY EFFICIENCY OF EXISTING WINDOWS

You can improve the energy efficiency of existing windows by adding storm windows, caulking and weatherstripping, and using window treatments or coverings.

Adding storm windows can reduce air leakage and improve comfort. Caulking andweatherstripping can reduce air leakage around windows. Use caulk for stationary cracks, gaps, or joints less than one-quarter-inch wide, and weatherstripping for building components that move, such as doors and operable windows. Window treatments or coverings can reduce heat loss in the winter and heat gain in the summer. Most window treatments, however, aren’t effective at reducing air leakage or infiltration.

SELECTING NEW ENERGY-EFFICIENT WINDOWS

If your home has very old and/or inefficient windows, it might be more cost-effective to replace them than to try to improve their energy efficiency. New, energy-efficient windows eventually pay for themselves through lower heating and cooling costs, and sometimes even lighting costs.

When properly selected and installed, energy-efficient windows can help minimize your heating, cooling, and lighting costs. Improving window performance in your home involves design, selection, and installation.

DESIGN

Before selecting new windows for your home, determine what types of windows will work best and where to improve your home’s energy efficiency. It’s a good idea to understand the energy performance ratings of windows so you’ll know what energy performance ratings you need for your windows based on your climate and the home’s design.

For labeling energy-efficient windows, ENERGY STAR® has established minimum energy performance rating criteria by climate. However, these criteria don’t account for a home’s design, such as window orientation.

Windows are an important element in passive solar home design, which uses solar energy at the site to provide heating, cooling, and lighting for a house. Passive solar design strategies vary by building location and regional climate, but the basic window guidelines remain the same—select, orient, and size glass to maximize solar heat gain in winter and minimize it in summer.

In heating-dominated climates, major glazing areas should generally face south to collect solar heat during the winter when the sun is low in the sky. In the summer, when the sun is high overhead, overhangs or other shading devices prevent excessive heat gain.

To be effective, south-facing windows should have a solar heat gain coefficient (SHGC) of greater than 0.6 to maximize solar heat gain during the winter, a U-factor of 0.35 or less to reduce conductive heat transfer, and a high visible transmittance (VT) for good visible light transfer. See Energy Performance Ratings to learn more about these ratings.

Windows on east-, west-, and north-facing walls should be minimized while still allowing for adequate daylight. It is difficult to control heat and light through east- and west-facing windows when the sun is low in the sky, and these windows should have a low SHGC and/or be shaded. North-facing windows collect little solar heat, so they are used only for lighting. Low-emissivity (low-e) window glazing can help control solar heat gain and loss in heating climates.

In cooling climates, particularly effective strategies include preferential use of north-facing windows and generously shaded south-facing windows. Windows with low SHGCs are more effective at reducing cooling loads.

Some types of glazing help reduce solar heat gain, lowering a window’s SHGC. Low-e coatings—microscopically thin, virtually invisible metal or metallic oxide layers deposited directly on the surface of glass—control heat transfer through windows with insulated glazing. Tinted glass absorbs a large fraction of incoming solar radiation through a window, reflective coatings reduce the transmission of solar radiation, and spectrally selective coatings filter out 40% to 70% of the heat normally transmitted through insulated window glass or glazing, while allowing the full amount of light to be transmitted. Except for spectrally selective, these types of glazing also lower a window’s VT. See Window Types to learn more about glazing, coatings, tints, and other options when selecting efficient windows.

If you’re constructing a new home or doing some major remodeling, you should also take advantage of the opportunity to incorporate your window design and selection as an integral part of your whole-house design—an approach for building an energy-efficient home.

SELECTION

You’ll find that you have several options to consider when selecting what type of windows you should use in your home.

When selecting windows for energy efficiency, it’s important to first consider their energy performance ratings in relation to your climate and your home’s design. This will help narrow your selection.

Illustration showing a cross-section of a window, with parts labeled. Double-paned glass is shown to have a low-e and/or solar control coating, a gas fill between the double panes, and a spacer at the base of the window between the panes. On the interior of the house is a strip of wood at the bottom edge of the window labeled the stop, and just in front of it is a step-like shelf labeled the stool. Beneath the stool and on top of a two by four is a thin pipe labeled the backer rod. On the exterior of the house, the illustration shows the frame of the window labeled the sash, and the shelf in front of the window labeled the sill. Weatherstripping is shown to be between the sill and sash. Beneath the sash, vertical against the house, is a strip of wood called the apron or flange, and the jamb is on the end of the sill.

A window’s energy efficiency is dependent upon all of its components. Window frames conduct heat, contributing to a window’s overall energy efficiency, particularly its U-factor. Glazing or glass technologies have become very sophisticated, and designers often specify different types of glazing or glass for different windows, based on orientation, climate, building design, etc.

Another important consideration is how the windows operate, because some operating types have lower air leakage rates than others, which will improve your home’s energy efficiency. Traditional operating types include:

  • Awning. Hinged at the top and open outward. Because the sash closes by pressing against the frame, they generally have lower air leakage rates than sliding windows.
  • Casement. Hinged at the sides. Like awning windows, they generally have lower air leakage rates than sliding windows because the sash closes by pressing against the frame.
  • Fixed. Fixed panes that don’t open. When installed properly they’re airtight, but are not suitable in places where window ventilation is desired.
  • Hopper. Hinged at the bottom and open inward. Like both awning and casement, they generally have lower air leakage rates because the sash closes by pressing against the frame.
  • Single- and double-hung. Both sashes slide vertically in a double-hung window. Only the bottom sash slides upward in a single-hung window. These sliding windows generally have higher air leakage rates than projecting or hinged windows.
  • Single- and double-sliding. Both sashes slide horizontally in a double-sliding window. Only one sash slides in a single-sliding window. Like single- and double-hung windows, they generally have higher air leakage rates than projecting or hinged windows.

: Illustration of six window types. The awning window is hinged at the top and pushes outward. The hopper style is hinged at the bottom and opens inward. The sliding style has one or two windows that slide side-to-side. A fixed window does not open at all. The double-hung window shows two sashes that slide vertically over one another. The casement window is hinged at the side and opens outward.

INSTALLATION

Even the most energy-efficient window must be properly installed to ensure energy efficiency. Therefore, it’s best to have a professional install your windows.

Window installation varies depending on the type of window, the construction of the house (wood, masonry, etc.), the exterior cladding (wood siding, stucco, brick, etc.), and the type (if any) of weather-restrictive barrier.

Windows should be installed according to the manufacturer’s recommendations and be properlyair sealed during installation to perform correctly. To air seal the window, caulk the frame andweatherstrip the operable components.

LEARN MORE

Blog by Energy.gov http://energy.gov/energysaver/articles/energy-efficient-windows

10 Signs You Need to Replace Your Siding

Replacing a home’s siding may not be at the top of most homeowner’s to-do lists. In fact, unless there is a specific and urgent problem with a home’s siding, replacing the siding may not be on the homeowner’s radar at all.

But perhaps it should be.

After all, siding does wear out. It cracks. It breaks. It gets old. Eventually it begins to leak; and when that happens it may already be too late to prevent other major (and potentially expensive) repairs.
But how does a homeowner know when a home needs new siding? What are some of the signs that the homeowner should look for, signs which signal that a home’s siding should be replaced before major damage occurs?

Luckily there are specific things the homeowner should look for in determining whether a home’s siding needs replacement. Here are ten sure-fire signs that a home’s siding needs attention before potentially catastrophic damage takes place.

1 – The Home Needs Frequent Painting
If a home needs frequent painting, say once every five or six years, that is a good sign that something is wrong with the current siding. Good home siding should keep its shape and keep its color for at least 8-10 years, if not longer. Siding that is chipping, pealing, or cracking is an indication that there is a fundamental problem and that the siding needs replacement.

2 – High Heating and Cooling Bills
When a home’s heating or cooling costs go through the roof (so to speak), that can be a sure sign that a home is in need of new siding. Naturally it is important to rule out a bad or leaking roof or lack of attic insulation as the culprit, but heating or cooling costs that are not in line with those of neighbors with similar structures is an indication that something is seriously flawed with a home’s exterior wall insulation.

Poorly performing siding and low grade wall insulation can be a prime cause for excess heating and cooling bills. If a visual inspection of the siding (as well as the seams where it meets the roof) indicates that heating or cooling could be escaping through the siding, then little more needs to be said.

3 – Rotting or Warping
Take some time to do a thorough visual inspection of a home’s siding. Take a relatively sharp object, such as a screwdriver, along on the inspection. Look specifically for warped siding or for rotting boards or other damage to siding material. Poke under any siding that has warped to discover how solid the under layer is. If the layer under a home’s siding has begun to rot or become soft, that is a sure sign that the home’s siding is due for immediate replacement.

4 – Cracked or Loose Siding
If only one or two boards are cracked or have come loose after a storm, this may not be cause for great alarm. It may be possible for a homeowner to remove one or two bad pieces of siding and replace them. Always be sure to check any layers underneath broken or cracked siding to make certain that there has not been additional, and possibly extensive, damage that will need to be repaired.

If large sections of the siding show signs of cracking, or if large numbers of siding pieces are loose, this can indicate severe problems that may require professional services.

In any event, cracked, broken, or loose pieces of siding must be removed and replaced. Otherwise, water may seep behind those pieces of siding and potentially cause severe (and expensive) problems down the line.

5 – Peeling Paint or Loose Wallpaper Inside the Home
It may not be immediately obvious to all homeowners, but peeling paint or wallpaper that is pulling away from a wall inside of a home can be symptomatic of faulty siding. Bad siding allows moisture to seep its way underneath the siding where it can percolate through wallboard and eventually cause significant damage to the interior walls of a home.

6 – Fungus, Mold, or Mildew
Any type of growth such as fungus, mold, or mildew on a home’s siding, especially at or near seams in the siding, may indicate that water is penetrating it and being held inside the wall, where it is slowly released once again, causing unwanted growth. While not all signs of fungus, mold, or mildew on siding is a cause for alarm, such growth should be cause to investigate further.

7 – Severely Faded Siding
Why should color fading be a cause for concern over a home’s siding? Because nothing lasts forever, and that includes siding. All siding has a life expectancy. Most siding is formulated to hold its color for only as long as the rating of the siding itself. If siding is so old that the color has faded, then that should tell the homeowner that the effective waterproofing of the siding may have also run its course. Faded color may not prove that a siding is no longer viable, but it is a good indication to watch for.

8 – Bubbles in the Siding
One almost certain sign that a home needs new siding is the presence of bubbles just under the surface of the siding. Bubbles are an almost certain indication that water has become trapped. Any indication of water trapped on or under the siding is an immediate red flag. The one thing that siding is meant to do is to keep moisture away from the walls under the siding.

9 – Holes in the Siding
Even small holes in a home’s siding can be a major cause for concern. Generally speaking, holes in siding are caused by insects. If insects have gotten into or through the siding, they can not only cause trouble on their own, but the holes they make also allow rain and snow to get into and, eventually, underneath the siding—and that can mark the beginning of some very costly repair work.

10 – Dry Rot
Tapping on siding with the handle of a screwdriver can reveal dry rot problems before they become noticeable to the naked eye. Dry rot begins below the surface of the siding and eats away the main body of the siding, basically leaving just the top layer of the siding intact. It is possible for the siding to look quite good even when the bulk of the material has rotted away.

Tapping on the surface of the siding with the handle of a screwdriver will reveal weak spots of dry rot, and pieces of siding which suffer from dry rot must be removed immediately and replaced. Extensive dry rot will require the entire home to be re-sided.
There are many reasons a homeowner might want to install new siding on a house.

Protecting a home from potential damage from rain, wind, snow, or insects by replacing old or worn siding is just one reason.

Another reason may be aesthetics. Most homeowners want their home to look its best, and new siding greatly enhances a home’s curb appeal when it comes time to sell.

At the end, one word of caution: replacing siding may look simple, but the truth is, it’s not. Cutting and fitting siding so that it is waterproof and windproof takes a certain amount of experience. Homeowners who are not experienced at replacing siding may be better off hiring professionals to do the job.

Blog by Siding Magazine http://sidingmagazine.com/do-it-yourself/top-10-signs-you-need-to-replace-your-homes-siding/

All About Entry Doors

Looking to make a great first impression? How about switching out that overgrown cereal box you call a front door for an entry door that’s as stylish and welcoming as you are? When it comes to adding some curb appeal to your home – and making a statement about who lives inside – your front door plays a leading role on the grand theater of your property.

Door manufacturers are willing partners, providing more options and configurations than ever, along with custom services that let you dial up your own personalized entry.

“One of the trends we see is toward unusual shapes and sizes,” says Brad Loveless, marketing and product development manager for Simpson Door Co. “People don’t necessarily want a cookie-cutter front door. After all, it’s one of the first things you see on a house and it lends terrific perceived value.”

The good news is that a good-looking entry door isn’t necessarily a budget buster. Yes, you can get a custom-made front door with gorgeous art glass and hand-forged hardware that costs as much as a late-model Porsche, and your entry will be nothing short of impressive. But today’s manufacturing techniques are sophisticated enough that even modestly priced doors are well-made and nicely designed and off-the-shelf models from home improvement centers include jambs and casings that turn door installation into an easy, money-saving weekend DIY project.

Dollars and Sense

Entry door prices start around $150 for ordinary six-panel steel doors and range up to $3,500 for solid wood doors with an art glass window. Add about $300 for professional installation of a basic door.  Made-to-order doors featuring rounded tops, custom craftsmanship or unusual sizes can cost up to $10,000. Prices for all doors can escalate depending on options, such as sidelights, transoms and hardware.

A new entry door adds value. According to Remodeling Magazine‘s annual Cost vs. Value report, an entry door replacement project featuring a new steel door returns almost 130 percent of the installed cost – the only project in the report that has an immediate positive return on your investment.

Image courtesy of Surewood Doors

Doors of Steel

A steel entry door combines strength and stability with relatively low cost. A steel door has a well-deserved reputation for security and weather resistance, but fiberglass and solid wood doors are solid performers too.

Steel doors aren’t made of solid metal – they have a polyurethane core with a 16- to 24-gauge steel skin. That core material is an excellent insulator, and steel doors rate high as thermal barriers.

Steel doors come either primed or with factory-applied paint. Some feature a vinyl coating that simulates the look of wood grain.

The Achilles heel of the steel door is that it is prone to dents and dings that may be difficult or impossible to repair and scratches in the surface may rust. In a heavy-use area, such as your front entry, the risks of accidental damage increase.

Precious Metals

On the opposite side of the price spectrum from steel, wood doors clad in aluminum, copper and bronze fill the need of homeowners who want durability and a distinct architectural accent. Aluminum-clad doors feature tough, factory-applied finishes that have warranties of 10 years of more and are exceptionally weather-resistant. Sophisticated extruding techniques ensure that joints and details are crisp.

Copper- and bronze-clad doors feature finishes that are changing subtly, but constantly, due to oxidation and their variegated appearances hide scratches and other imperfections gathered over time. Teresa Grabill, CFO of custom window and door manufacturer Grabill in Almont, Mich., estimates that a bronze-clad door costs approximately 40 percent more than a comparable all-wood door.

Image courtesy of Surewood Doors

Fiberglass

If there’s a buzzword in the world of entry doors, it’s fiberglass. Price-wise, fiberglass sits in the middle between steel and wood doors, but outperforms both in terms of toughness and low-maintenance.

Similar to steel doors, fiberglass-clad doors feature an inner foam core that contributes light weight and high energy efficiency. The core is covered with a layer of fiberglass that’s impervious to moisture, rot and insects.

These days, door manufacturers are getting very good at having embossed fiberglass mimic the look and feel of real oak, mahogany, fir and other woods. Finished in one of a variety of stain colors, fiberglass doors are tough to tell from the real deal. Crisp detailing on good-quality models completes the deception.

Fiberglass doors are stable and won’t warp in weather extremes and are good candidates for paint. Because fiberglass doesn’t contract and expand with changes in humidity as much as real wood, paint and stains last a long time, and fiberglass doors rarely need a touch-up.

Fiberglass doors are readily available at home improvement centers where price ranges from $200 to $2,500. Complete fiberglass door systems with a pair of art glass sidelights reach $3,500.

According to Remodeling Magazine, a fiberglass entry door replacement project doesn’t have as big of a return as that of a steel door, recouping only about 65 percent of your investment.

Wood

If your plans call for a front door with character, warmth and style, wood is the top choice. Unmatched for natural beauty and substance, wood doors with a natural or stained finish harmonize with all styles of houses. Lower-grade woods and finger-jointed construction – doors made with unmatched pieces of wood – take paint readily. In the hands of an experienced craftsman, wood is relatively easy to shape and cut, so custom possibilities are endless.

Wood doors generally are the most expensive door option, ranging from $500 to $4,000 for standard manufactured doors and more for custom sizes and configurations. Popular woods include oak, cherry, mahogany and clear fir, but wood door specialists may offer more exotic options.

“We’re always experimenting with new technologies and materials,” says Simpson’s Brad Loveless. “We’re currently using some very tough, weather-resistant woods such as black locust and nootka cypress that are incredibly durable.”

If environmental impact is a concern, look for doors made with wood certified by theForest Stewardship Council to be sustainably grown and harvested.

The drawback of wood is that it needs consistent maintenance, especially in harsh climates or if the door is exposed to moisture and direct sunlight. Hairline cracks and changes in the color or texture of the surface signal it’s time to repair the finish. Expect to touch up your door’s finish every two or three years.

Image courtesy of Simpson Door Co.

Bells and Whistles

Although you can buy an entry door all by itself, most come as door systems that include the framework and all the necessary hinge mortises and cutouts for latches and deadbolts. Systems can get quite elaborate, and can include double doors, one or two sidelights and rectangular or arched-top transom windows. Finished entryway systems can be 16 feet wide and nearly as tall.

Doors can be solid, all-glass and everything in between with limitless selections of grills and art glass possibilities thrown in to the mix. “Options and flexibility are driving factors in the market right now,” says Lance Premeau, product and market analyst for Kolbe Windows and Doors. “Consumers want the freedom to choose their own styles and materials. As a result, our product offerings are very complex.”

To help the stylistically challenged consumer negotiate this option-rich environment, the web sites of most major manufacturers offer sophisticated data bases that provide styles, shapes, colors, and other goodies at the click of a mouse. However, you’ll probably have to have a local supplier work up a price for your tricked-out entry.

Blog by DIY Network http://www.diynetwork.com/how-to/rooms-and-spaces/doors-and-windows/entry-doors-portal-to-the-soul-of-your-house